Writing a WordPress Plugin
I wanted to write a WordPress plugin for quite some time but hadn’t really needed to. I have been producing amazing WordPress websites for clients and using great plugins that extend the functionality of WordPress core is part of what makes them amazing and useful. A couple months ago I was looking for a plugin that would allow me to add a navigation tab to the side of the website I was building at the time. You could call it a global call to action. I thought it would be a quick search. Head over to the plugin repository, type in some keywords, review the list and start vetting. This was the first time that I couldn’t find what I was looking for. I was really surprised. I needed something simple and it wasn’t available. Sure, there were plugins that might have worked but as I investigated further, they were all bloated with too many features.
At that moment, I knew it was time to build my own. If I needed it, chances are someone else would need it too. I didn’t want to create a plugin just to go through the motions. If I was going to do this, I wanted to solve my own problem and learn more about the guts of WordPress.
My inspiration for the plugin came from a theme I used a couple of times before. The theme had an option to add a feedback tab to the left side of the browser. It was a great looking tab with a hover on-state that changed the tab color. It was pretty sweet. Nice and easy. Problem was, the tab was built using an image sprite. The tab said “FEEDBACK” which limited it’s usefulness. If you had a feedback page, it was perfect. If your website colors were orange and grey, it would be an amazing fit. In the theme options page, you had a checkbox to turn it on and a textbox for the URL you wanted to link it to. You know, your feedback page… if you had one. I needed something more useful, I had to build Simple Side Tab.
Getting Started
I searched online for some resources for building a WordPress plugin and found some pretty nice how-to guides right off the bat. I filtered through the results for pages directly referencing plugins that had an options page to store some data. Now we’re talking. At a minimum, I needed to store text for the tab and a few color options. Nothing too extensive. I wanted to keep it simple, yet useful. Writing a plugin to solve my problem also makes it portable so I can use on multiple websites without hassle.
Here was my plan to create my first WordPress plugin:
- Step 1: Hardcode a proof of concept
- Step 2: Move the code to a working plugin
- Step 3: Create an options page to store data
- Step 4: Polish it up
- Step 5: Publish!
Step 1 – Hardcode a proof of concept
To make it work, I first hardcoded some HTML on a page in my WordPress sandbox site and wrote some CSS to style it up. There was a <DIV> for the tab itself and a CSS class where I could manipulate how it looked. The trickiest part was rotating the div so the text is vertical. Once I got the hardcoded version to work, it was time to break it up and start making a plugin to make it dynamic and portable. There isn’t much to it really but I wanted to make sure I can pull off the vertical side tab before continuing. The last thing I wanted to do was to put hours upon hours into something and not have anything to show for it.
Step 2 – Move the code to a working plugin
I referenced one of the online how-to guides and a few WordPress codex pages to get the plugin started. I converted the hardcoded functionality into a basic plugin that rendered a text string from a PHP variable into a tab with hardcoded CSS. Nothing dynamic yet, it was hardcoded but it worked. The tab displayed when activated and disappeared when it was deactivated. Step 2 was complete. On to the next one…
Step 3 – Create an options page to store data
 This was the fun part. My breakthrough came when I created the options page to store the text for the tab. It was surprisingly easy to create and store the first data value. WordPress has so many build in functions and the API is robust. Next, I built the textbox for storing the URL and a few more for css color values for the tab. These were all very easy to add after I had the first one set. Then, I added a dropdown for font choices. I hardcoded the list to make sure I could apply selected=”selected” to the proper <OPTION> row in the input field so the value wouldn’t get lost. Each time I added another value to the database, I replaced the hardcoded CSS value with the dynamic value stored from the options page. It got better with every option.
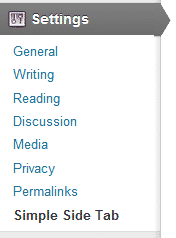
The essential technical pieces were in place. I had a PHP file for my code that created an options page in the WordPress settings tab and stored data in the database. I was over the hump. Next, I had to make it worthy of publishing in the WordPress repository.
Step 4 – Polish it up
This step defiantly took the longest. The proof of concept was a breeze, converting the code into a plugin was pretty easy and creating the options page storing custom data was only moderately complex. Polishing the features and the code proved to be very time consuming. There were two major improvements and several standard ones that just needed to be done.
The first major improvement was data storage. When I first added options to the database, I stored each data value in it’s own row in the wp_options table using a unique option_name and option_value. Yes, this was easy and allowed me to quickly develop extended plugin features but I knew before releasing it, I had to store all these values in an array in one wp_options row. It’s a recommended practice because it’s clean and a little bit faster. It’s not sexy and it’s one of those details that nobody sees. It took some time but it was well worth it. I know it’s there and that’s important to me.
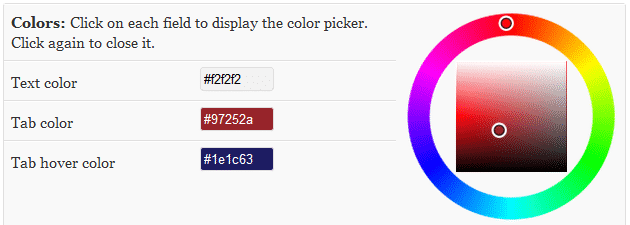
The second major improvement was adding a color picker to the color options fields. I could have published without it but it would not have been very intuitive. Designers and developers wouldn’t have problem adding hexadecimal color values into a text fields but WordPress end users needed something better. I have seen many color pickers in the last couple years but I decided to use Farbtastic. It’s built into WordPress so the plugin would remain light. I never want to add technology unless it’s absolutely necessary. Farbtastic would do the trick so why not use what’s provided. WordPress is good like that.

Other improvements include:
- Default data – added a routine to store field values when the plugin is activated so it displays properly from the start
- Plugin settings link – make a nice and easy link to the settings options page from the plugin list
- Validate user – you are kicked out if you don’t have permission – “Validate user has permission to execute this page”
- Uninstall – added uninstall.php to clean up the values stored to wp_options when the plugin is removed
- Final code review – make sure functions and variables were properly prefixed and well documented
Step 5 – Publish!
The hard work was done and now it was time to publish. I captured a few screenshots, wrote the readme.txt file and created a nice banner for the plugin repository page to finish it off right. I didn’t know every detail about submitting a WordPress plugin to the repository and I was actually surprised by a couple steps. I had to make my code available online for review before it would be approved. That’s a good idea for sure but I didn’t know that there would be another human reviewing my code. Using Subversion to publish took me a little extra time because I had to research it a bit and find a UI to help me get my code up to the plugin page. I ended up using the Windows client TortoisSVN. My plugin was live within 15 minutes of sending the code. Finally, I was a published author on the WordPress repository. That felt great.
Summing it all up
This was an amazing and empowering experience. Like the title says, “Want to learn more about WordPress? Write a plugin!”. That’s exactly what happened. I really got my hands dirty using hooks and hitting the database. My goal was to publish a plugin that stores data using a settings options page and improves the usability of a website. I solved my own problem and have something great to show for it. Not only that, I have a framework that I will use to write custom plugins for my clients to further customize the solutions I provide for them.
I plan on improving this plugin over time. I already have several features planned for the next few versions and community feedback has been great.
If you have a plugin in the WordPress repository, what was your experience like? Please take a minute to share your story.
Resources:
- WordPress Codex – Writing a Plugin
- WordPress Codex – Plugin API
- Professional WordPress Plugin Development


Great making-of post, Scot! I’ve tweaked plugins, but haven’t yet written my own, so I found your experience interesting. I’d like to see a future post about updating the plugin (deciding which features to add and leave out) and providing support.
The question of whether plugins should remove their data from the database is controversial. On the one hand, a user may deactivate a plugin temporarily and not want their settings removed, but on the other hand, databases can become cluttered with orphaned data. I like plugins that provide the option to delete data upon uninstallation, so it’s the user’s decision.
It was a great learning experience for sure. Simple Side Tab has almost 500 downloads now, half of those in the first two days. It has been fun to see people making great use of it. Expect a follow up post a week or so after the next version release. I will have to make some decisions on what features to include and what to keep out. Some may never make the cut. That will be interesting. Well, I think it is.
I have a couple more plugins in the pipeline that I am sketching up. Nothing to release very soon but they are on the horizon.
Cheers!